

We’ve all been there: you’re cozied up under your comforter, watching the rain falling outside and thinking – wouldn’t it be nice to capture this moment? Well, with our easy step-by-step guide on how to draw a rainy day, now you can!
Whether you are a newbie or an experienced artist who needs some inspiration on how to draw a rainy day – we’ve got everything you need.
With just a few basic supplies like paper, pencils, and paints (plus helpful tips from us), it’s time to learn how to draw those perfect raindrops and moody clouds! So grab your supplies, and let’s get started.
How Do You Draw a Simple Rainy Day?
Let’s start with drawing a simple rainy day. Here are the essential steps on how to draw a rainy day:
Step 1: Start with the Clouds
Start off with drawing the rain clouds, as their placement will determine how the rest of your rainy-day picture will look. To draw a typical rain cloud, sketch two slightly curved lines that dip down in the middle. Then add a few smaller oval shapes inside of these curved lines to create the cloud.
Add some shading on the edges and around the ovals to make the clouds look more realistic. If you want to make your clouds look a bit darker, you may color them grey or black. Shading isn’t as complicated as it looks – just lightly color in the sides of the cloud with a light grey pencil or marker.
Step 2: Draw the Raindrops
With the rainclouds all set, it’s time to draw the raindrops! Raindrops usually fall in a diagonal pattern from the clouds, so make sure to place them accordingly.
To draw your raindrops, start by sketching a few circles of various sizes – these will be your raindrops. You can also do some long thin ovals if you prefer the look of those. Then add some shading around the edges of each raindrop to make them look more realistic.
Make sure that your raindrops aren’t all the same size or shape – it will make your picture look more realistic. And don’t forget to add some lines underneath each raindrop for their shadow!
Step 3: Add Other Details
Now that you’ve got the clouds and raindrops drawn, it’s time to add the other details of a rainy day. You may want to add a few trees or buildings in the background to create a sense of atmosphere. Or how about adding some umbrellas and people walking around in the rain?
You can also work on making your clouds look more detailed by adding more shading or even drawing lightning bolts if you’re daring! Whatever you choose to add in, make sure it fits the overall mood of your rainy day drawing.
How Do You Draw Rain Hitting Something?

If you’re ready to take your rainy day drawing up a notch, how about adding some rain hitting something? This can be anything from a window to the ground below – it’s totally up to you!
To draw this, start by sketching out the object the rain will be hitting. This object can be anything from a windowpane to a pond – it’s totally up to you. Make sure it’s placed somewhere in the middle or lower portion of your drawing.
Next, draw a few curved lines extending from the clouds above to where the object is located. These lines will be your rain hitting the object. You can also add some shading around them to give them more of a realistic look.
Note that curved lines won’t be the most realistic representation of rain, but that’s the beauty of art – you can add your unique spin to it! Still, if you prefer going the realistic route, how about trying out some dotted lines? These will look more like actual rain hitting an object. Make sure the lines are a bit swollen in some areas and more spaced out in others – that way, it’ll look like the rain is actually falling.
Now back to the object itself. After drawing the rain, you need to make it look like the raindrops hit the object and then ran off or dripped down. To do this, draw a few small circles around the object and some thin lines extending outwards from them. These circles and lines will be the water droplets that form after the rain hits something.
How Can Kids Make a Rainy Season?
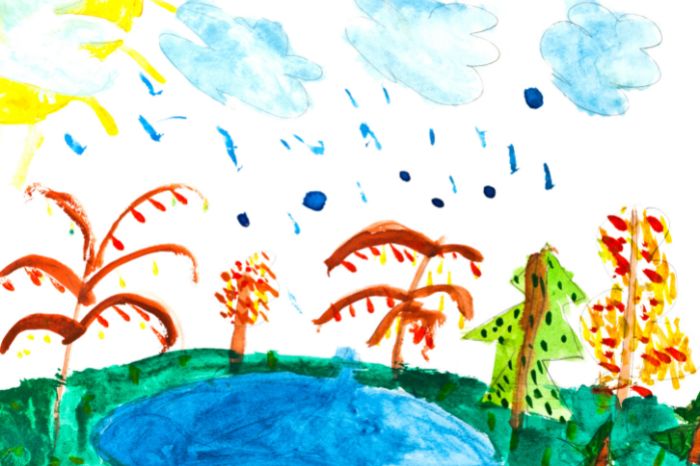
Teaching kids how to draw a rainy day is one thing, but how about teaching them how to draw an actual rainy season? This will help them further develop their drawing skills and better understand how rain is formed.
Start With the Clouds
It all starts with the clouds. To make sure that your child understands how clouds work, have him or her draw several different kinds of clouds – cumulus, cirrus, and stratus. Cumulus clouds can be drawn with a few basic shapes (circles and ovals), while cirrus and stratus clouds can be drawn with wispy lines.
Draw Raindrops and Lines from The Clouds
Once your child is comfortable with drawing clouds, it’s time to move on to the most important part – the raindrops! Have your child practice drawing a variety of sizes and shapes for their raindrops and how they look when they’re falling from the sky.
For example, most raindrops will be round and falling straight down, but how about making some of them look like they’re being swept away by the wind? Or how about drawing raindrops that are shaped differently – like teardrops or hearts?
Add Some Wind and Lightning
Since your child will be drawing the whole rainy season and not just a rainy day, how about having them draw some gusts of wind and lightning too? This will make the drawing look much more realistic and exciting.
Drawing wind is relatively easy – draw some curved lines with dots and dashes to indicate the wind’s strength. As for lightning, have your child practice drawing bolts of lightning extending from the clouds.
Final Touches
Finally, it’s time to add some final touches! Have your child draw a few trees or buildings in the background and some people with umbrellas walking around. This will give the drawing a bit of life and make it look more complete.
And that’s it! Now that you know how to draw a rainy day, why not encourage your kids to try it out? With a bit of practice and some help from you, they’ll be able to create their own rainy season in no time! Thanks for reading, and happy drawing!
Final Thoughts
It is not easy to draw, especially if you are a beginner, have never taken private lessons before, or are simply a child who does not yet have the necessary dexterity. However, after reading this article, you now know how to draw a rainy day easily, in a more complicated way, and you have also learned some drawing tips that are appropriate for children!
Do you have any other suggestions or solutions that you might share? Don’t be shy about sharing them in the comments section; it might be helpful to other people who use the internet. And don’t also hesitate to share some funny anecdotes about the times you failed! Don’t forget that failure leads to success, so don’t be afraid to try, try and try all over again!